Overview
Setting up Rock Check-In can feel a little intimidating at first—especially if you’re new to Rock. Over the years, we’ve seen check-in setups that became far more complicated than necessary, often missing out on Rock’s built-in strengths that actually make life easier.
This guide is designed to help you avoid those pitfalls. Our goal is to keep your check-in experience simple, flexible, and effective. By applying a few best practices, you’ll create a system that works well for admins, families, volunteers, and staff alike.
Let’s jump in!
Basic Terminology
Before diving into strategy, let’s review some key terms you’ll see often in Rock Check-In.
Group Type
In Rock, a group type is a collection of groups that share similar characteristics. For example, a “Small Group” group type contains multiple groups with common traits like leaders, members, and schedules.
Additionally, in Check-In, group types serve a few special roles:
- Check-In Configurations – These are actually group types with the purpose “Check-In Template”. Their settings are stored as group type attributes.
- Check-In Filters – Group types with the purpose “Check-In Filter”. Examples include “Check-In by Age” or “Check-In by Grade,” and they have attributes like Location Selection Strategy.
- Check-In Areas – These appear on the configuration screen as “header” rows (with a folder icon and blue line). Examples include “Nursery” and “Preschool". Unlike the others, Check-In Areas don’t have a specific group type purpose assigned. These are basically normal group types.
Group
A group in Rock Check-In is mainly used as an attendance container. It may or may not have actual members. You can record attendance for a person even if they aren’t a member of that group.
One thing that isn't always obvious at first: groups that are created in a check-in configuration are real groups. It can be confusing at first, because they don't show up in the Group Viewer, but that's because their group types aren't set to Show In Navigation by default. Enabling that setting will make them instantly appear in the Group Viewer.
The reason that setting isn't enabled by default is that check-in groups very often don't need to display in the Group Viewer, because they likely don't (and won't) have members.
Location
Usually a physical room (e.g., “3rd Grade Room”), but (typically for volunteer scheduling purposes) it can also be a role or position, like “Cash Register” in the Café.
Schedule
As expected, specifies the date and time when a group meets.
Check-In Configuration
A Check-In Configuration does three things:
- Organizes check-in areas, groups, locations, and schedules.
- Provides reporting filters for tools like Attendance Analytics.
- Stores kiosk behavior settings (e.g., security code parameters, search type, allow duplicate check-in).
Important: Configurations aren't related to which areas and groups are available and allowed to check in at a kiosk—that’s determined by kiosk admin settings or URL parameters. This is a common misunderstanding that leads to unneeded, superfluous check-in configurations.
The Core Principle: Keep It Simple
The single most important rule of check-in design: simplicity wins.
It’s easy to assume you need a separate configuration for each campus, ministry, or event. But in reality, most large churches function with just four or five configurations total. More than that often leads to confusion and unnecessary complexity.
So when should you create another configuration?
- When a configuration becomes too cluttered with groups to manage effectively.
- When unique kiosk settings are required (e.g., different search modes or security code lengths).
- When reporting requires filtering attendance by a distinct set of groups or areas.
If none of these apply, stick with fewer configurations.
Designing Across Multiple Campuses
One of the best ways to simplify your setup and plan for the future is to design with multiple campuses in mind.
- Areas – If “Nursery” exists at every campus, don’t create a separate area for each. Use one shared “Nursery” area.
- Groups – A “1-Year-Olds” group can be shared across campuses. Assign one group multiple campus locations rather than duplicating groups.
- Schedules – Reuse schedules where possible, especially when service times are the same across campuses.
This reduces unneeded duplication and ensures simplicity and consistency.
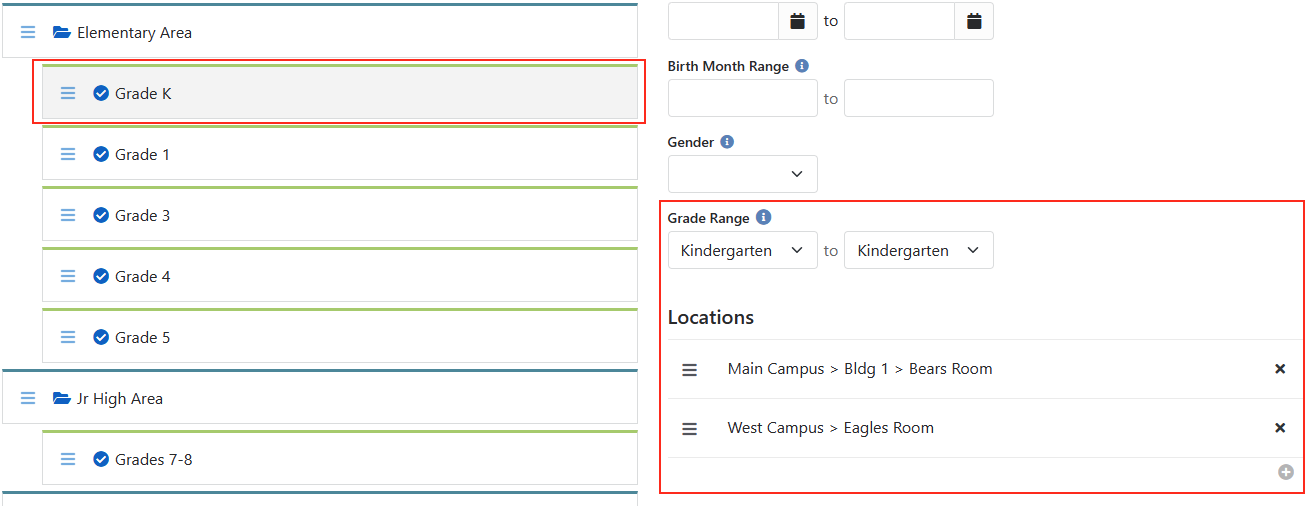
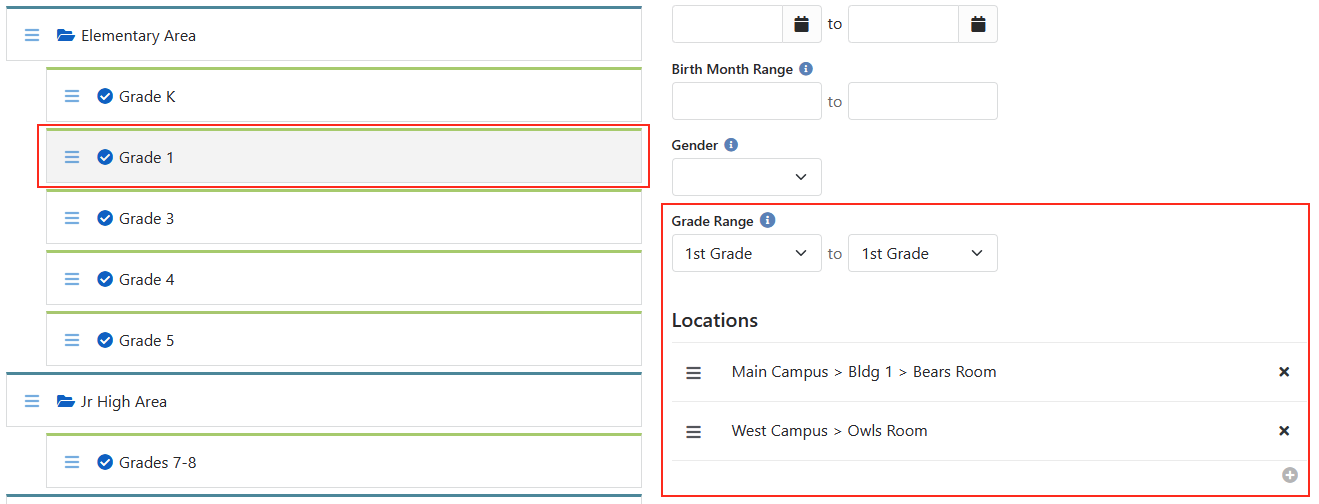
Here's an example of one Elementary Area (and its groups) shared across campuses. Note that the groups have a location for each campus, and the "K" and "1st" groups meet in the same room at the Main Campus, but in different rooms at West Campus. Note that we split the groups by grade level, even though some meet together in one room.
Building for Flexibility
To keep your setup future-ready, design groups at the right level of detail.
- Split by grade or age – as in the example above, instead of creating combined groups like “K–2” or “2–4,” make individual grade-level groups (“K,” “1st,” “2nd,” etc.).
- Assign locations per campus – Example: the 2nd Grade group might meet in “K–2” at Campus A, but in “2–4” at Campus B.
If ministry spaces change, simply reassign groups to new locations. If you had combined grades, you’d have to rename groups (losing history) or inactivate them and start fresh.
Granularity up front pays off later.
Conclusion
Rock Check-In is powerful, but with that power comes the inherent tendency to overcomplicate. By keeping things simple, designing for flexibility, and making smart use of configurations, you’ll create a check-in system that’s easy to manage and a joy to use.
Remember:
- Share groups and areas across campuses.
- Split by grade/age for flexibility.
- Keep the number of configurations low.
- Always prioritize simplicity and flexibility when possible.
With these practices in place, your check-in will serve families, volunteers, and staff well—both today and for years to come.